Quake Alarm™
Installation and Operating Instructions
Installation Instructions
Preparing the Device for mounting
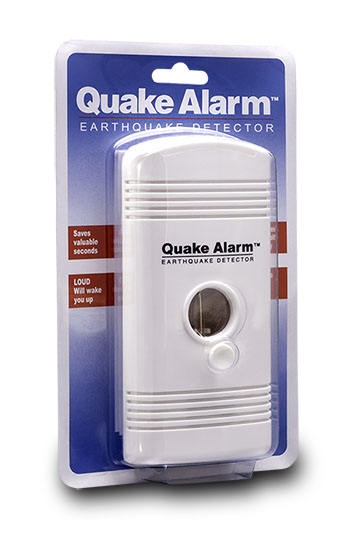
Remove product from it’s packaging.
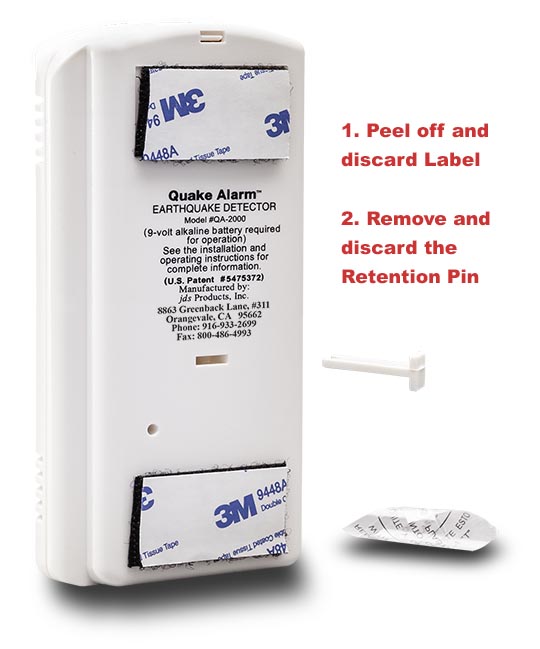
IMPORTANT: Do Not install a battery until your Quake Alarm™ is installed and mounted to the wall.
Mounting Instructions
Choosing the BEST Location
Your Quake Alarm™ can be mounted to various locations depending on your personal needs. One good location is in or near a bedroom where it will wake you up and provide an instant alert to allow you to take shelter or tend to other family members. Your Quake Alarm™ can be mounted behind curtains, beside a night stand or in a hallway. It can also be mounted in general living areas such as living rooms and dens.
To achieve greatest sensitivity from the device Mount on a Firm Wall or over a Stud Location on a load bearing wall.
Important Note
It is best if the Quake Alarm™ is mounted away from doors due to the vibrations caused when doors close.
If there are small children in the household, it is recommended that the Quake Alarm™ be mounted out of their reach.
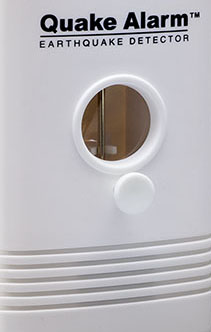
Pendulum in Triangular Contact
Your Quake Alarm™ mounts on the wall with the use of the Velcro® strips located on the back of the unit. Hold the unit against the wall to see how the PENDULUM (seen through the adjustment window) swings back and forth as you move the Quake Alarm™. When properly installed, the PENDULUM should be in the center of the TRIANGULAR CONTACT.
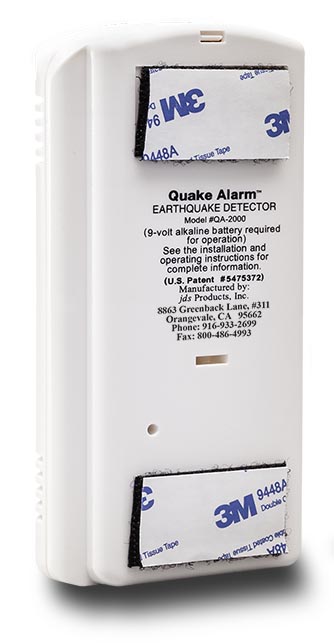
Velcro on back
1.) CLEAN: Clean and dry the surface of the wall where your are going to mount the Quake Alarm™.
2.) REMOVE: Peel away the white protective covering on back of the Velcro® strips.
3.) POSITION: Hold the Quake Alarm™ about a 1/2″ away from the mounting location that you have chosen (straight out from the wall).
4.) ALIGN: While looking through the adjustment window, Align the pendulum in the middle area of the triangular contact.
5.) MOUNT: While keeping the pendulum in the middle area of the triangular contact, slowly move the Quake Alarm™ toward the wall unit the Velcro® strips make contact with the wall, then firmly press the Quake Alarm™ against the wall for the adhesive to stick to the wall.
6.) CENTER: To center the pendulum from front to back (within the triangular contact) rotate the sensitivity adjustment screw knob clockwise or counter clockwise.
7.) ADJUST: If the pendulum needs adjustment to center it in the middle of the triangular contact, then slightly loosen the lower end of the Quake Alarm™ by pulling on the bottom to separate the Velcro® and move it slowly left or right as required to center the pendulum. Then press the Velcro® strip back together by pushing the unit against the wall.
Note: Steps 5 & 6 can be repeated until proper alignment has been achieved.
Wall must be clean and dust free for the Velcro® strips to stick.
Battery installation
Installing the 9-Volt Battery

Once you are satisfied that the pendulum is centered in the middle of the triangular contact, install a fresh 9-volt alkaline battery to the battery clip and place the battery into the battery compartment. The battery compartment is located on the top of the Quake Alarm™ housing and is opened by lightly pushing down on the back of the cover and sliding the cover towards you (away from the wall). Reinstall by sliding in place and pushing down on the back of the cover.
Battery Life: Replace the battery every two to three years depending on the shelf life of the particular battery that you install into the unit. It is recommended that you test the alarm monthly.
Sensitivity Adjustment
Optimize for your Area
Warning
Prolonged exposure to loud frequency noise can cause hearing loss. When adjusting and testing your Quake Alarm™, it is best to cover the sound ports on the front of the device with masking tape or hold your fingers lightly over the sound ports.
Don’t forget to remove tape after it’s adjusted.
Sensitivity adjustment is accomplished by turning the SENSITIVITY ADJUSTMENT SCREW KNOB in or out.
- Turning the knob clockwise increases the sensitivity.
- Turning the knob counter clockwise decreases the sensitivity.
While making sensitivity adjustments, the positioning of the pendulum and triangular contact must be observed through the adjustment window. To adjust your Quake Alarm™ to its most sensitive setting, SLOWLY turn the knob counter clockwise until the steady alarm sound turns into a pulsing alarm sound. Allow the pendulum a few seconds to stop moving between each adjustment. Continue to VERY SLOWLY turn the knob counter clockwise until the alarm no longer sounds.
Your Quake Alarm™ is now set to its most sensitive setting. If you find that walking or jumping on the floor or shutting a door causes the device to sound the alarm, then SLOWLY TURN THE KNOB COUNTER CLOCKWISE IN VERY SMALL INCREMENTS (1/16th of a turn). Continue this procedure until you are satisfied that the alarm will not sound during normal events in and around the home or office.
Another method of testing the sensitivity setting (if it is not mounted on a concrete or block wall) is to push against the wall with the palm of your hand next to your Quake Alarm™. At its most sensitive setting, this will cause the alarm to chime.
Testing
Test your Quake Alarm™

Test your Quake Alarm™ by placing your finger or thumb above the Quake Alarm™ label and lightly press and release until a chime is heard. The device will automatically stop after a few seconds. Testing should be accomplished after any adjustment. Family members should be made aware of the unique sound of the Quake Alarm™ so they will automatically think about Earthquake Safety whenever the Quake Alarm™ chimes.
Troubleshooting
Tips & Tricks
The Sensitivity
Sensitivity adjustments must be made in very small increments. It is especially important to allow the pendulum to settle down between any adjustments so that its resting position can be determined relative to the lower contact. Remember that the initial adjustment position is set so that the pendulum is located in the approximate middle area of the triangular contact. Once this is accomplished, then the final sensitivity adjustment can be set by using the sensitivity adjustment screw knob.
Alarm not audible
- The earthquake could have been too far away and its energy level was too low to be detected by the time it reached your area.
- The Quake Alarm™ sensitivity may be set too low.
- The Quake Alarm™ may be mounted too far away from a bedroom or office space.
- Battery may need to be replaced.
Location
8863 Greenback LN, #311
Orangevale, CA 95662
Phone
Office (916) 933-2699
Mobile (916) 397- 6668
Fax
(800) 486-4993
Int’l (916) 933-4993